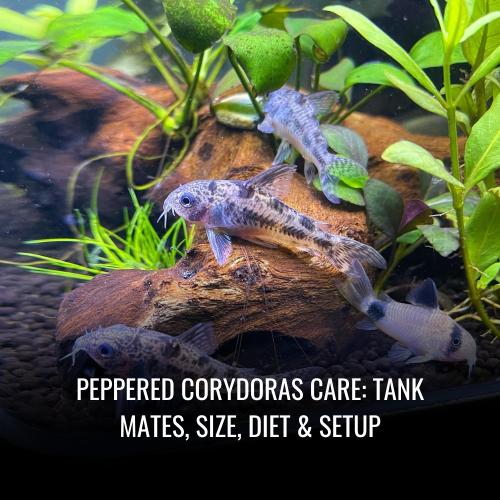
To treat high alkalinity in a fish tank, conduct a partial water change and add buffers. Maintaining a balanced ph level is crucial for the health of fish in an aquarium.
However, sometimes the alkalinity level can become too high, causing problems. High alkalinity can lead to unstable ph levels and harm fish. The best way to handle high alkalinity is to perform a partial water change, removing between 25% and 50% of the existing water, and replace it with fresh, treated water.
Additionally, buffers can be added to the water to help regulate ph and alkalinity levels, preventing any future issues. Understanding how to properly treat high alkalinity can help keep fish healthy and happy in their aquatic environment.

Credit: badmanstropicalfish.com
Step 1: Test The Alkalinity Level
When it comes to keeping a fish tank, maintaining the water quality is essential for the health and happiness of our aquatic pets. One critical aspect of water quality is alkalinity, which is the measurement of the water’s ability to neutralize acid.
High alkalinity levels in a fish tank can lead to multiple problems, such as cloudy water, algae growth, and an increase in harmful bacteria, which can cause harm to fish and aquatic plants. So, before treating high alkalinity in a fish tank, it’s essential to test the alkalinity level accurately.
In this section, we’ll discuss the importance of measuring the alkalinity level in a fish tank and how to use a test kit to measure it.
The Importance Of Measuring The Alkalinity Level In The Fish Tank
- Alkalinity is a critical factor in balancing the ph level of the fish tank’s water.
- A high alkalinity level can cause the ph level to rise, making it challenging to control and maintain the ph balance.
- Alkalinity is related to water hardness, which can have significant impacts on fish’s health and well-being.
- Measuring alkalinity is crucial to know if the water is fit for the fish or not.
- Measuring alkalinity allows you to take appropriate steps to balance the water’s ph level and ensure the fish’s good health.
Using Test Kits To Measure The Alkalinity Level
Once you understand the importance of measuring alkalinity, the next step is to learn how to do it accurately. The most efficient and straightforward way to check alkalinity is by using a test kit. Follow the steps below to test alkalinity in your fish tank;
- Firstly, gather all the necessary materials like a test kit, a clean container for water, and a clean pipette for collecting water.
- Fill the container with water from your fish tank.
- Rinse your test kit and add the necessary chemicals as per instructions.
- Use the pipette to collect a sample of aquarium water.
- Slowly add the test chemicals to the sample one-by-one and shake the container lightly after each step.
- Observe the sample to see any color changes, which will indicate the alkalinity level.
- Compare the color of the final sample with the reference chart provided with the kit.
- Note down the alkalinity level for future reference.
By measuring the alkalinity level in your fish tank, you can take necessary steps to balance the ph level and ensure your aquatic pets remain healthy and happy. Remember to test frequently and add necessary chemicals to maintain the alkalinity level within the optimal range suitable for your fish species.
Step 2: Identify The Cause Of High Alkalinity
Understanding The Causes Of High Alkalinity
Before we dive into identifying the cause of high alkalinity in your fish tank, it is essential to understand the factors that contribute to high alkalinity. Here’s what you need to know:
- Alkalinity refers to the ability of water to neutralize acids and maintain a stable ph level. It is measured in terms of carbonate hardness (kh) or bicarbonate levels (hco3-).
- High alkalinity levels can cause significant harm to the fish and plants in your aquarium. It creates a harsh environment that can affect ph levels, making it challenging for aquatic life to thrive.
- There are several reasons why alkalinity levels can spike in your fish tank, including overuse of chemicals, crushed coral substrates, and contaminated water.
Identifying The Source Of High Alkalinity
Identifying the cause of high alkalinity is critical to restoring a healthy environment for your fish. Here are some tips that can help:
- Test the ph level of your aquarium water using a reliable testing kit. This will give you an accurate reading of the alkalinity levels.
- Check your water source to ensure it is free from contaminants that may affect the ph level. The chlorine level and other chemicals in tap water can increase the alkalinity levels.
- Evaluate the substrate you are using in your fish tank. Some substrates like crushed coral, limestone, or shells contain high levels of calcium that can increase the ph level.
- Monitor the frequency and amount of chemicals you are using in your aquarium regularly. Overuse of chemicals like ph buffers and additives can spike alkalinity levels.
By following these tips, you can successfully identify and address the cause of high alkalinity levels in your fish tank. It will help you maintain a healthy environment for your aquatic life to thrive.
Step 3: Removing Water From The Fish Tank
Understanding Why It’S Important To Remove Water From The Fish Tank
When treating high alkalinity in a fish tank, removing water is a crucial step. Here’s why:
- High alkalinity can cause harm to the fish, making it essential to keep it under control.
- Removing water helps to dilute the alkalinity level in the tank.
- Topping up the tank with fresh water helps to bring down the alkalinity level, but it’s not as effective as removing the contaminated water from the tank.
How To Remove Water From The Tank
Now that we have covered why removing water is vital let’s look at how to do it properly:
- Before starting, make sure you have all the necessary equipment ready. You will need a siphon hose, a bucket, and a hose clip if using a faucet or a tank adaptor if using a sink.
- If you have live plants in your tank, be mindful of their roots while removing water.
- Use the siphon hose to extract water from the tank. Make sure the hose is submerged into the water before starting the suction.
- Keep the other end of the hose low, so the gravity helps to push the water out of the tank.
- Once the water has started to drain, you can use the bucket to store it.
- If you need to remove a large amount of water, take frequent breaks to avoid straining yourself or damaging the tank’s environment.
Removing water from a fish tank to treat high alkalinity is an essential step to keep your aquarium healthy and safe for its inhabitants. Follow the steps above, and your tank will be back to its optimal environment in no time.
Remember, taking care of your aquarium is not just about the fish but also about the plants and the overall ecosystem.
Step 4: Adding Distilled Water To The Fish Tank
The Importance Of Distilled Water In Treating High Alkalinity
Using distilled water to treat high alkalinity in fish tanks is a crucial part of the process. Here are some key points to keep in mind when using distilled water:
- Distilled water ensures that the water you add to the tank is consistent in quality, free from any chemicals, and is absolutely pure. This not only helps to prevent any further increase in alkalinity, but also maintains a stable and healthy environment for the fish.
- Always check the ph levels of the distilled water before adding it to the tank. The ph level should be close to neutral or slightly acidic, as this is the best range for most fish species.
- Although using distilled water is a good solution for managing alkalinity, excessive use of distilled water can cause other problems such as fluctuating ph levels and weakened bio-filtration. So, always follow the guidelines carefully and use distilled water only as needed.
How To Add Distilled Water To The Tank
Once you have distilled water at hand, it is time to add it to the fish tank. Here’s what you need to keep in mind:
- First, ensure that the temperature of the distilled water is the same as the temperature of the water already in the tank. This is important to prevent any shock to the fish that could occur due to sudden changes in temperature.
- Slowly pour the distilled water into the tank, avoiding any splashing or sudden pressure changes that could cause anxiety to the fish.
- Use a testing kit to monitor the ph levels after adding the distilled water. If needed, adjust the levels using appropriate chemicals or by adding more distilled water.
Remember that high alkalinity in a fish tank can lead to unpleasant odors, slimy residue, cloudy water, and stress for the fish. By using distilled water, you are ensuring that the tank maintains a balanced and healthy environment for the fish.
So, follow the guidelines carefully, and don’t hesitate to seek professional advice if required.
Step 5: Adjusting The Ph Level
Understanding The Importance Of Ph In Fish Tank Health
Maintaining the correct ph level in a fish tank is crucial for the health and well-being of the fish. The ph scale ranges from 0-14, and any deviation from the optimal range of 6. 5-7. 5 can cause harm to the fish.
Understanding the significance of ph in fish tank health is crucial when treating high alkalinity in a fish tank. Here are some key points to consider:
- The ph level affects the fish’s ability to breathe, digest food, and maintain their immune system.
- Water hardness, temperature, and alkalinity can all impact the ph level in the tank.
- A ph test kit will help you determine the ph level of your tank water and allow you to make necessary adjustments.
Adjusting The Ph Level Using Chemically-Treated Water
When treating high alkalinity in a fish tank, you may need to adjust the ph level using chemically-treated water. Here are some key points to consider when using this method:
- Use ph decreaser chemicals to lower the ph level.
- Follow the manufacturer’s instructions carefully to avoid overdosing.
- Allow the treated water to sit for an hour before adding it to the tank.
- Use a ph test kit to ensure that the ph level is at the optimal range before adding fish back into the tank.
Adjusting The Ph Level Using Natural Methods
While chemically-treated water can be effective, some fish owners prefer to adjust the ph level of the tank using natural methods. Here are some key points to consider when using this method:
- Adding driftwood, almond leaves, or other natural substances to the tank can lower the ph level.
- Using a reverse osmosis (ro) system to filter the water can also lower the ph level.
- Avoid adding acidic substances such as vinegar to the tank, as this can harm the fish.
Remember, it is essential to monitor the ph level regularly and make adjustments as needed to maintain a healthy and thriving fish tank environment.
Step 6: Using Vinegar To Lower Alkalinity
The Use Of Vinegar As A Natural Remedy To Lower Alkalinity
Tired of high alkalinity levels in your fish tank? Vinegar—the pantry staple that always comes in handy—may be the solution you’ve been looking for. It’s a natural and cost-effective way of reducing high alkalinity in fish tanks. Here’s everything you need to know.
Preparing A Vinegar-Water Mixture To Add To The Fish Tank
- Before you add anything to your fish tank, make sure that you have tested the water and determined the appropriate amount of vinegar to use.
- Depending on the size of your tank and the alkalinity levels, the ideal ratio of vinegar to water can vary. A rule of thumb is to mix about 1 cup of vinegar with 5 gallons of water.
- Once you’ve mixed the vinegar and water, let it sit for an hour or so to allow it to fully combine and dissolve.
- After a few hours, test the water again to see if the ph level has dropped to the desired range. If it hasn’t, add more vinegar to the mixture and test the water again after a few hours until you achieve the desired result.
- It’s important to be cautious when adding vinegar to your fish tank. Adding too much vinegar can cause your fish to go into shock and may even kill them. Therefore, it’s best to add small amounts of vinegar gradually rather than all at once.
Whether it’s your first time treating high alkalinity levels in your fish tank or you’re already a seasoned aquarium hobbyist, using vinegar is a safe, natural, and cost-effective solution. Just remember to test the water before and after using vinegar and to always add it carefully and gradually.
Step 7: Installing An Aeration System
The Benefits Of An Aeration System In Maintaining Ph Levels
When it comes to keeping your fish healthy, it’s essential to monitor and maintain the ph levels of your tank. High alkalinity can cause serious issues, even death, to your fish. Installing an aeration system can significantly help maintain the ph levels of the tank.
Here are some of the benefits of an aeration system:
- Oxygenation: By circulating the water, an aeration system creates oxygenation, ensuring that your fish receive the required amount of oxygen to survive. The water’s oxygen level affects the ph level of the tank, and proper oxygenation can aid in reducing high alkalinity levels.
- Water circulation: An aeration system circulates the water, preventing the buildup of bacteria and debris in stagnant areas of the tank. This ensures that the water is as clean as possible, reducing the risk of high alkalinity levels caused by contamination.
- Chemical balance: The ph level of your tank heavily relies on the chemical balance of the water. An aeration system creates water movement that mixes the chemicals evenly, reducing the risk of high alkalinity.
How To Install An Aeration System In The Fish Tank
Installing an aeration system is relatively easy and can be done by following these steps:
- Choose the appropriate aeration system for your tank size: The size of the aeration system should be based on the size of your fish tank. Ensure that the system you choose can handle the volume of water in your tank.
- Place the aeration system: Installing the aeration system requires setting it up at the appropriate location in the tank. Decide where you’d like the system to be placed, either at the bottom or near the top of the tank. Ensure to read the manufacturer’s instructions before placing the system.
- Connect the airline tubing to the aeration system: The airline tubing is what carries air to the aeration system. Connect one end to the aeration system and the other to the air pump, ensuring that it’s a tight fit.
- Install the air pump: The air pump is what powers the aeration system. Find a suitable location and plug it into a power source.
- Test the system: Once the installation is complete, plug in the air pump and observe if the aeration system is working flawlessly.
- Periodically clean the system: To ensure the aeration system works correctly, ensure that it’s clean and well-maintained. Clean it every month to keep it working at peak efficiency.
By installing an aeration system, you can maintain the ph levels in your fish tank, prevent high alkalinity, and ensure that your fish thrive in a healthy environment.
Step 8: Choosing The Right Fish
The Impact Of Fish Species On Alkalinity Levels In The Fish Tank
Choosing the right fish species is crucial to maintain a healthy environment for your fish. Different types of fish have different needs, and they can have an impact on the alkalinity levels in your fish tank. Here are some key points to keep in mind:
- Some fish produce waste that can increase the alkalinity levels in the tank, while others produce waste that can lower the alkalinity levels.
- Fish that require a higher ph level tend to increase the alkalinity in the tank, while those that require a lower ph level tend to lower the alkalinity.
- Saltwater fish generally require a higher ph level than freshwater fish, which can impact the alkalinity levels in your fish tank.
Choosing Fish Species That Require Similar Water Conditions
One way to keep the alkalinity levels balanced in your fish tank is to choose fish species that require similar water conditions. When selecting fish, it’s important to consider the ph level, temperature, and water hardness, among other factors. Here are some key points to keep in mind:
- Doing some research beforehand can help you determine which fish species require similar water conditions. This can include looking up the fish’s natural habitat and preferred water conditions.
- Avoid keeping fish that require vastly different water conditions in the same tank, as this can lead to stress, illness, and death among the fish.
- Consider creating multiple smaller tanks if you want to keep fish species that require very different water conditions.
Choosing the right fish species is essential when it comes to treating high alkalinity levels in your fish tank. By understanding the impact that different fish can have on the alkalinity levels and choosing fish that require similar water conditions, you can maintain a healthy environment for your fish.
Step 9: Regular Tank Maintenance
High alkalinity can be a common problem in fish tanks, but it can be managed through regular tank maintenance. Preventing high alkalinity is an essential component of keeping your fish tank and its inhabitants healthy.
The Importance Of Regular Tank Maintenance In Preventing High Alkalinity
Plain paragraph: regular tank maintenance is one of the most effective ways of preventing high alkalinity. It reduces the accumulation of contamination and promotes better water quality in your aquarium. The importance of regular tank maintenance is further highlighted when it comes to preventing high alkalinity.
Here’s why:
- Regular cleaning reduces the buildup of debris that can impact water quality
- Water changes help remove excess nutrients and contaminants
- Testing the water parameters regularly helps detect any potential problems early on
- Maintaining the filter system is critical to regulating the chemistry of the water
Tips For Regular Tank Maintenance
Bullet points:
- Change 20-30% of your tank water every two weeks or more frequently if necessary.
- Clean your aquarium equipment regularly. You can use vinegar, hydrogen peroxide, or baking soda solution with warm water to clean the equipment and accessories.
- Trim and prune live plants in your aquarium regularly to remove dead leaves, stems, and branches that can release organic waste.
- Test your water frequently using a water testing kit to monitor ammonia, nitrate, nitrite, ph, and alkalinity levels. If you notice any abnormal levels, take appropriate measures to correct them.
- Vacuuming the substrate regularly helps remove uneaten food, fish waste, and other debris that can increase the alkalinity levels of the water.
- Avoid overcrowding and overfeeding your fish as this can lead to excess waste in the water, which can cause high alkalinity.
- Ensure your fish tank receives enough light without overexposure, and keep it away from direct sunlight.
- Use a water conditioner to eliminate chlorine, chloramines, and other harmful chemicals that could affect the water quality.
Regular maintenance is essential for maintaining optimal water quality in fish tanks and preventing high alkalinity. With these simple tips and proactive measures, you can create a healthy environment for your fish to thrive.
Step 10: Avoiding Common Mistakes
If you’ve followed all the proper steps to treat high alkalinity in your fish tank and are still having issues, it’s possible that you may be making some common mistakes. Don’t worry, it happens to the best of us, but it’s crucial to be aware of these mistakes and learn how to avoid them in the future.
This way, you can maintain a healthy and happy environment for your beloved fish. So, let’s take a look at common mistakes made in treating high alkalinity and how you can avoid them.
Common Mistakes Made In Treating High Alkalinity
- Not testing the water frequently enough
- Testing the water once a week isn’t always enough. High alkalinity can shift quickly, so it’s essential to be testing the water frequently. If your tank is prone to high alkalinity, consider testing the water every other day or every day until the levels stabilize.
- Overdosing with chemicals
- It may be tempting to add extra chemicals to try and fix the high alkalinity quickly, but this can often make things worse and even harm your fish. Follow the manufacturer’s instructions carefully, and don’t exceed the recommended dosage.
- Adding too much water too quickly
- Adding new water to your tank is a delicate process that needs to be done slowly. Adding too much water at once can shock the fish and upset the chemical balance of your tank. Add water gradually, allowing the fish to acclimate to the new water.
How To Avoid Making These Mistakes In The Future
- Keep a detailed log of water tests
- Keeping track of your water test results in a log will help you understand your tank’s patterns and allow you to detect any fluctuations in alkalinity levels.
- Research supplements and chemicals
- Before adding any new chemicals or supplements to your tank, always research and read the instructions thoroughly. Never exceed the recommended dosage.
- Monitor water levels when adding water
- When adding new water to your tank, be sure to do it slowly and monitor the alkalinity levels carefully. If you notice a sudden spike in alkalinity, stop adding water and wait for it to stabilize before continuing.
By being mindful of these common mistakes and taking steps to avoid them, you’ll be on your way to maintaining a healthy and happy environment for your fish. Remember to test the water frequently, be careful with chemicals, and take it slow when adding new water.
Following these simple guidelines will keep your alkalinity levels in check and your fish thriving.
Frequently Asked Questions For How To Treat High Alkalinity In Fish Tank
What Causes High Alkalinity In Fish Tanks?
High alkalinity in fish tanks is often caused by the build-up of waste and minerals, including carbonates and bicarbonates, in the water. It can also result from using certain types of rocks or substrates in the tank that leach minerals into the water.
Why Is High Alkalinity Harmful To Fish?
High alkalinity can be harmful to fish because it can lead to ph imbalances in the water. This, in turn, can cause stress and health problems for fish. Additionally, high alkalinity can make it difficult to stabilize ph levels in the tank.
How Can I Measure The Alkalinity In My Fish Tank?
You can use a test kit designed specifically for measuring alkalinity in aquariums. These kits typically use a titration method to measure the concentration of carbonate and bicarbonate ions in the water. You can also have the water tested at a pet store or aquarium supply shop.
What Are Some Ways To Reduce High Alkalinity In A Fish Tank?
Several methods can help reduce high alkalinity in a fish tank, including performing partial water changes, using reverse osmosis water for water changes, adding driftwood or peat moss to the tank, and using commercially available alkalinity reducers.
Can I Prevent High Alkalinity From Occurring In My Fish Tank?
Preventing high alkalinity from occurring in a fish tank involves using the proper type of substrate, maintaining proper filtration and water circulation, and monitoring water quality regularly. It’s also important to feed fish appropriately and avoid overstocking the tank.
Conclusion
Maintaining the alkalinity levels in your fish tank is vital to ensure a healthy and thriving aquatic ecosystem. High alkalinity levels can cause harm to your fish and other inhabitants and harm the overall stability of the tank. In this article, we have discussed various methods to treat high alkalinity in your fish tank, including water changes, adding vinegar or citric acid, and reducing the amount of food you feed your fish.
By regularly checking the ph and alkalinity levels and taking necessary steps to treat high levels, you can ensure a healthy and thriving aquatic environment for your fish and other aquatic creatures. Remember, a well-balanced ecosystem is essential for the long-term health and survival of your fish and plants, and regular maintenance and monitoring are necessary to achieve this.